 DJ lemon-Sour's diary (prod.hisasann)
React・Reduxを使ったElectronアプリのboilerplateを作ってみました
hisasann/electron-react-redux-boilerplate
はじめに
Node.js + Babel 6 + React + Redux + Webpack + Gulp + Electron
Electronを母体として、React・Reduxを使ったフロントエンドのアーキテクチャについて試したことをメモメモ
Webpackはbrowserifyとしか使っていません
Electron
最近はやりのElectron(MacやWindowsのアプリ化)を使った場合の開発の仕方や、どうやるのが効率的かを少しずつメモしていきます
現時点では、Electronでビルドしたアプリのリリースやアップデートに関しては未調査になります
Livereload
まずは Livereload これがないとはじまりません
以下の記事を参考に、gulpのタスクを作ってみました
ぼくのかんがえたさいきょうのElectron - Qiita
- RendererProcessで読み込んでいるコードが変更されたら, 画面をreload.
- BrowserProcess(MainProcess, main.jsなど)で動作するコードが変更されたら, RendererProcessもろともBrowserProcessを再起動
使ったnpmモジュールは、Quramy/electron-connectです。
gulpのタスク
import gulp from 'gulp';

import gulpLoadPlugins from 'gulp-load-plugins';
const $ = gulpLoadPlugins();

import configs from '../config';
const config = configs.electron;

import electronConnect from 'electron-connect';
const electron = electronConnect.server.create();

gulp.task('serve', function () {
  // Electronの起動
  electron.start();

  // BrowserProcess(MainProcess)が読み込むリソースが変更されたら, Electron自体を再起動
  gulp.watch(config.browserProcess, function() {
    console.log('BrowserProcess reload');
    electron.restart();
  });

  // RendererProcessが読み込むリソースが変更されたら, RendererProcessにreloadさせる
  gulp.watch(config.rendererProcess, function() {
    console.log('RendererProcess reload');
    electron.reload();
  });
});
htmlファイル
<!-- gulp側で立てたserverへ接続する -->
<script>require('electron-connect').client.create()</script>
このhtmlは本番環境では不要なので、gulp-userefなどで消去するとよい
React / Flux
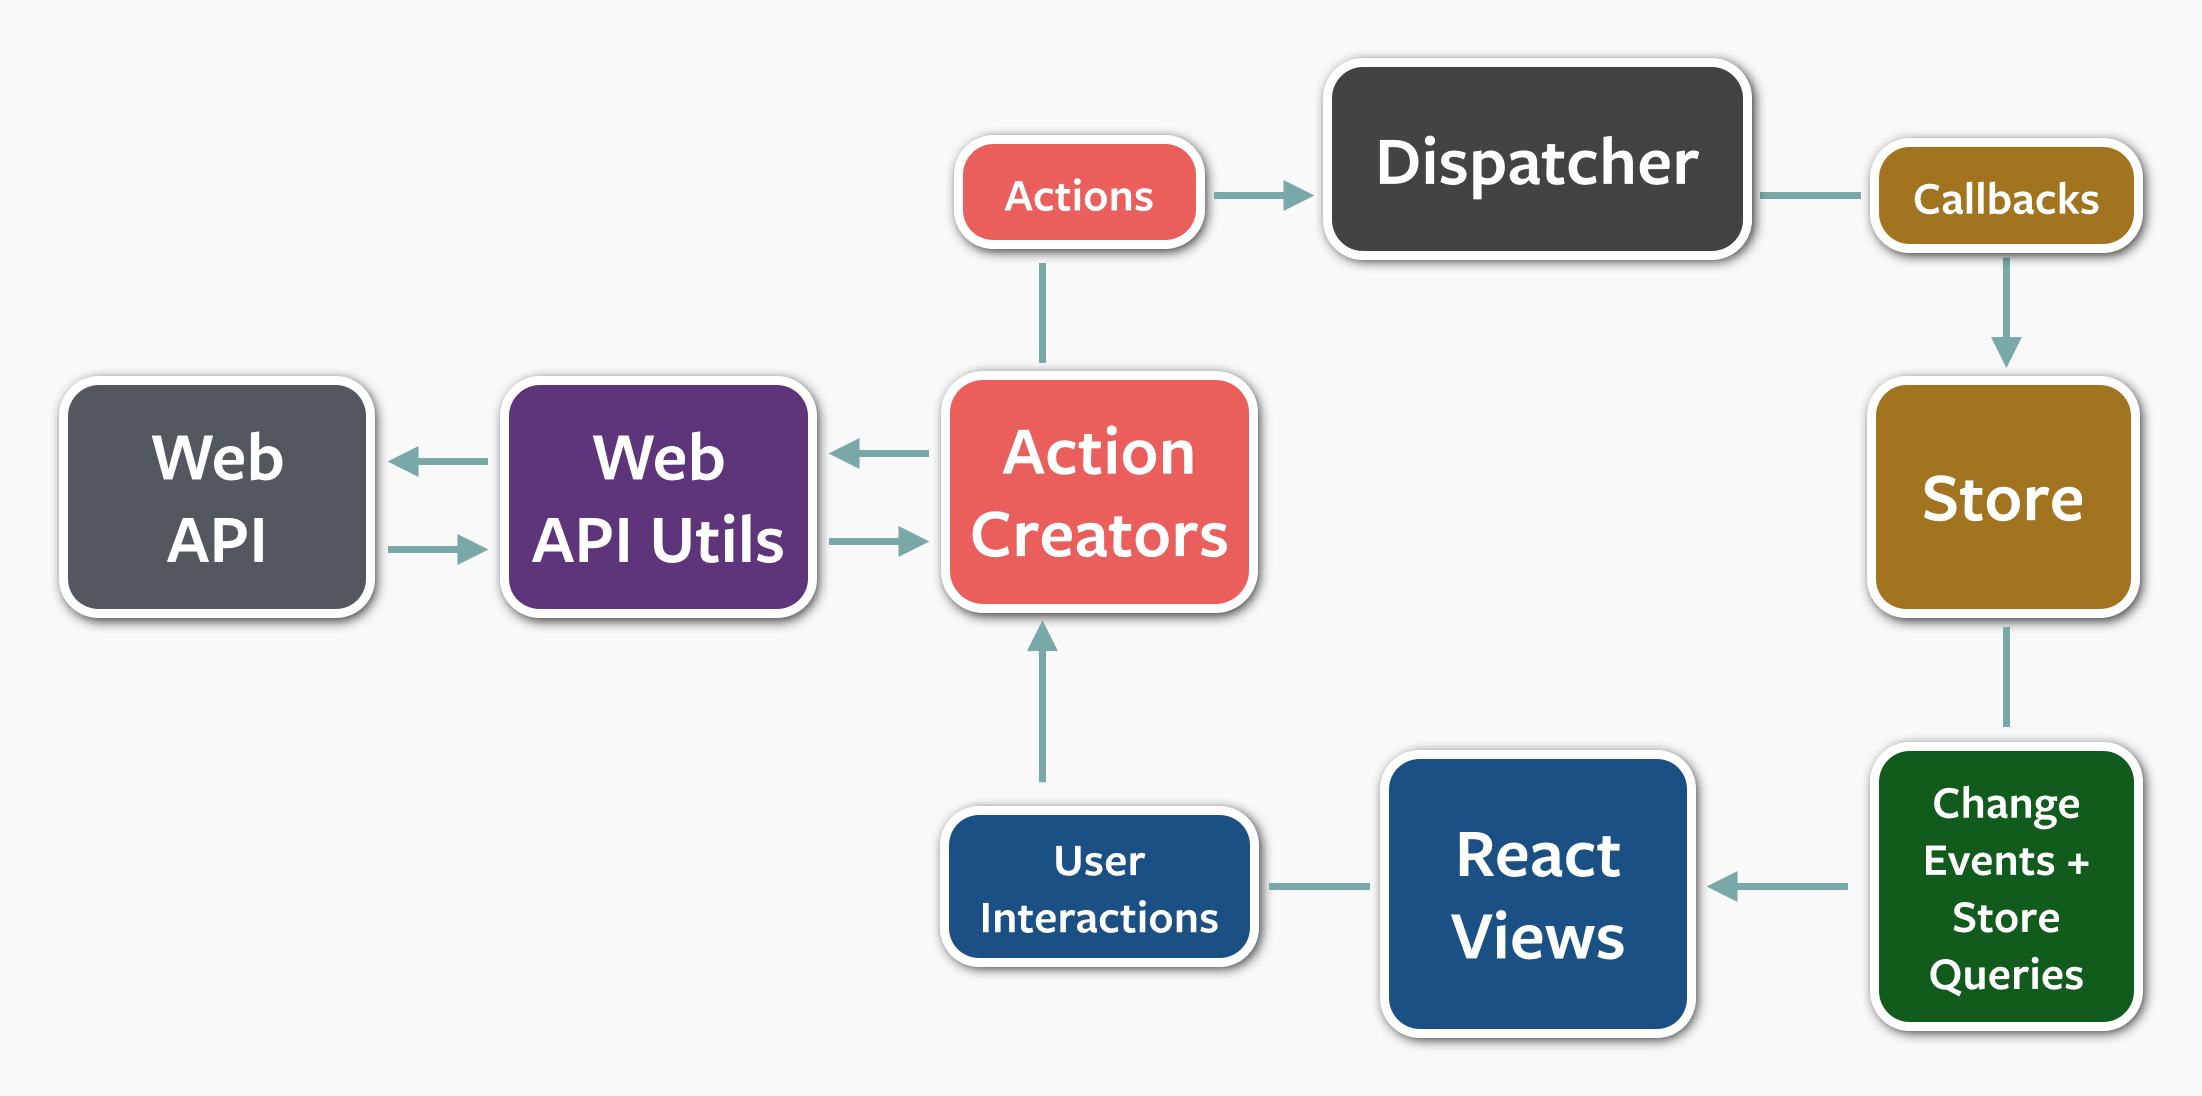
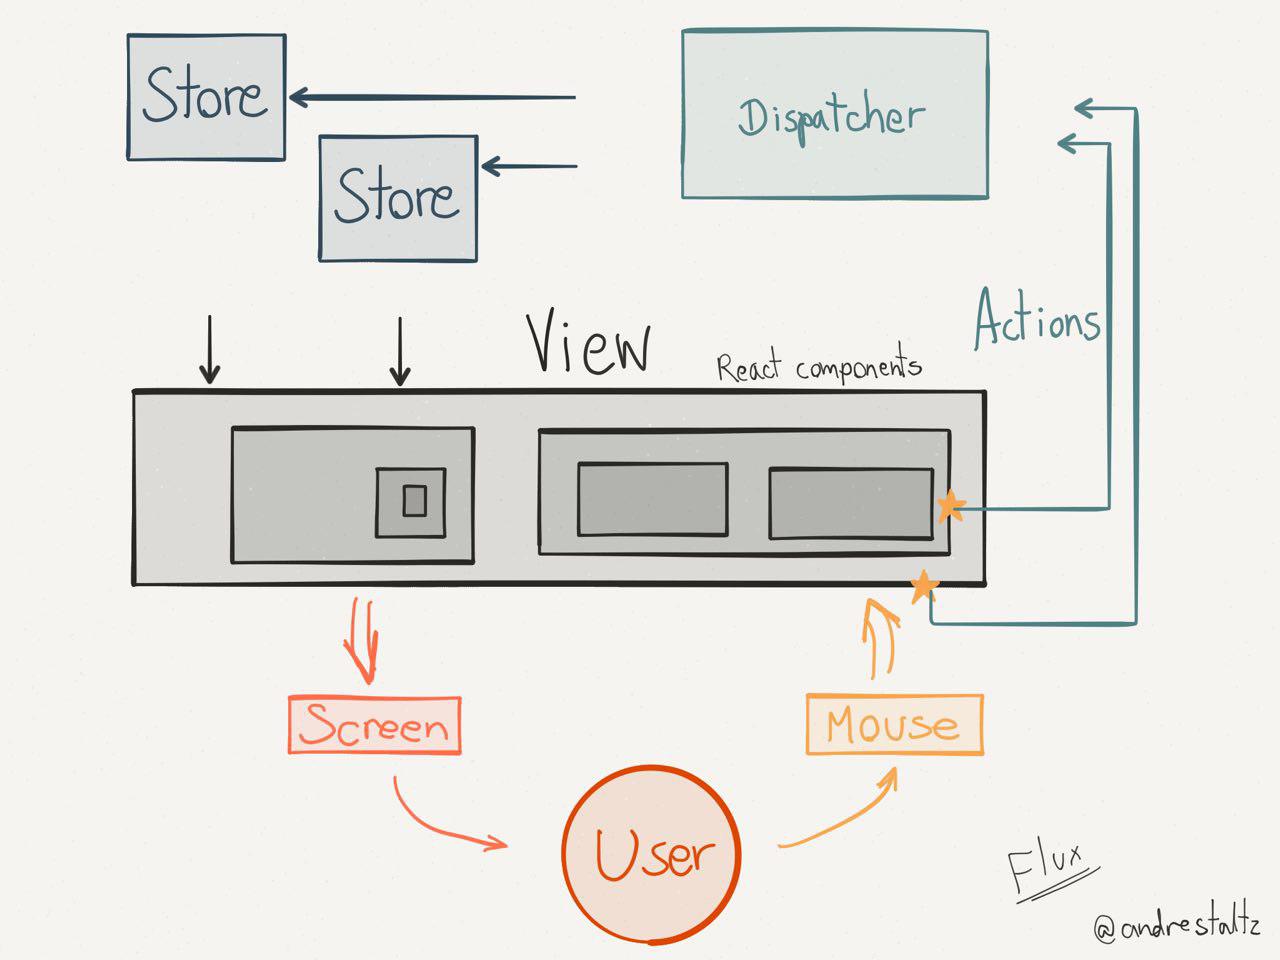
via React.js architecture - Flux VS Reflux
ここでは、Fluxについてはふれません
詳しくは、facebook/flux などをお読みください
React / Redux
今回の目玉です
WordPress.com が Redux を使って全面リニューアルしたようなので、大規模で使われた良い例なのではないでしょうか
しかも、OSSです
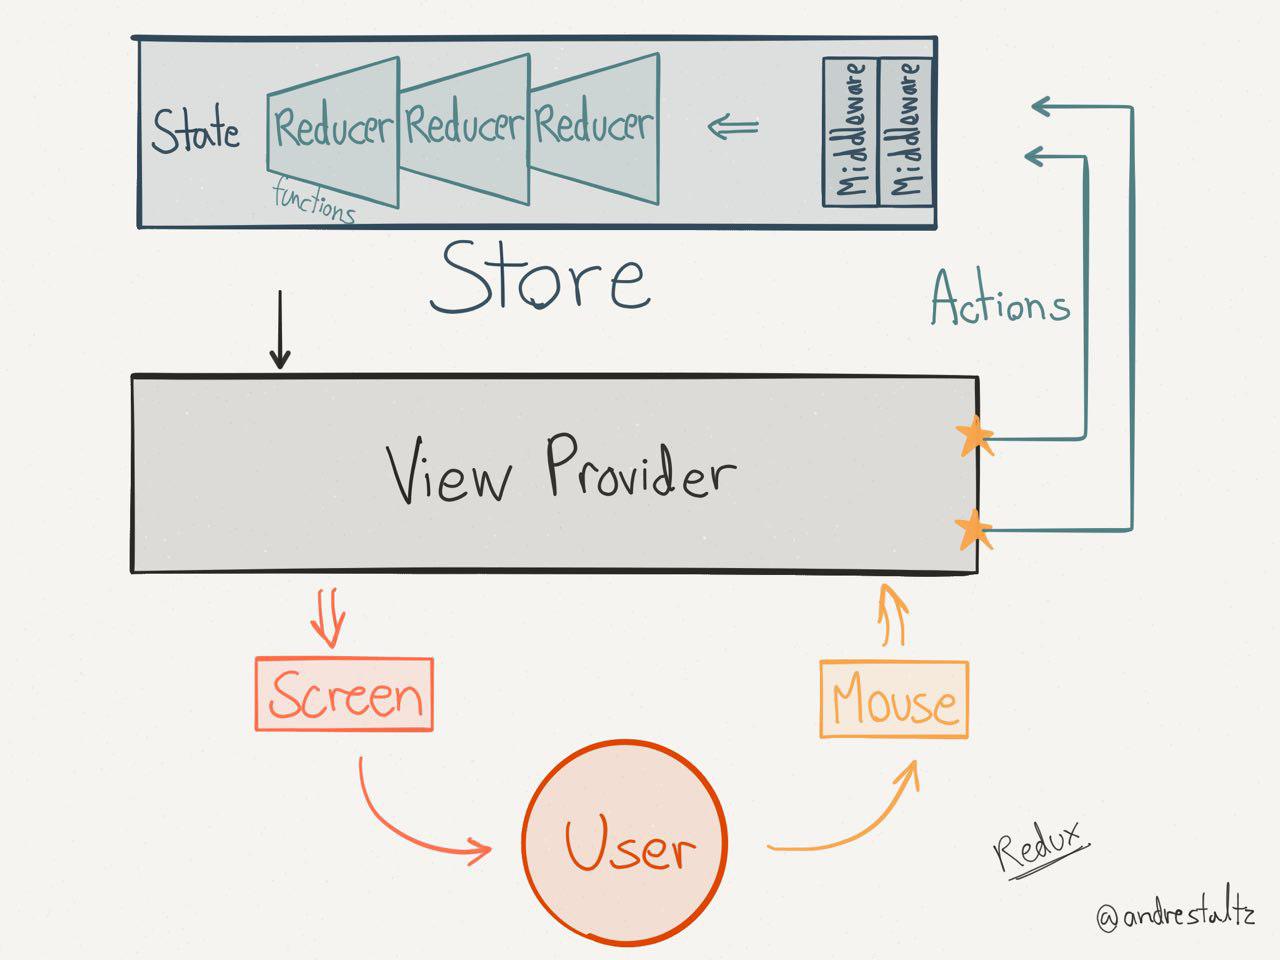
まずはこの図を見て、なんとなく処理がどうながれるか確認しておきましょう
| [Read Me | Redux](http://redux.js.org/index.html) |
また、このリポジトリのサンプルコードは、routingを組み込んだ状態になります
なので、routingを組み込まない場合のReduxの書き方は少し違いますが、以下の内容と合わせて読んでいけば理解できるかと思います
ざっくりと、ReactとReduxを接続する手順としては、
- rootのcomponentを **
** でwrapする - wrapしたcomponentをrackt/react-reduxのconnectメソッドでReactとReduxをつなぐ
- connect()することで、actionがpropに、storeがpropとして受け取れるようになる
では、順番に見ていきましょう
Entry Point
Entry Pointはまさに一番rootに位置するコードで、最も親の部分になります
以下のサンプルコードたちは、シンプルで理解しやすい、
redux/examples/counter at master · rackt/redux を引用しています
import React from 'react'
import { render } from 'react-dom'
import { Provider } from 'react-redux'
import App from './containers/App'
import configureStore from './store/configureStore'

const store = configureStore()

render(
  <Provider store={store}>
    <App />
  </Provider>,
  document.getElementById('root')
)
ここで大切なのが Provider です
-
rootのcomponentとしてReactコンポーネントをwrapします
-
propsとしてstoreを受け取りReduxのオブジェクトに登録する
Container Components
- 渡されたstoreはconnect()でwrapされたcomponentを通じて共有される
- connectで以下のようにcomponentに接続することでcomponentのpropsにstateとactionが渡される
import { bindActionCreators } from 'redux'
import { connect } from 'react-redux'
import Counter from '../components/Counter'
import * as CounterActions from '../actions/counter'

function mapStateToProps(state) {
  return {
    counter: state.counter
  }
}

function mapDispatchToProps(dispatch) {
  return bindActionCreators(CounterActions, dispatch)
}

export default connect(mapStateToProps, mapDispatchToProps)(Counter)
Action Creators and Constants
actionでは、
bindActionCreators(CounterActions, dispatch)
でactionをbindすることで、この後、reducerに値が流れるようになります
また、Ajaxなどの非同期処理はここでやるのがよさそうです
非同期処理は、Reduxそのままだけではうまく動かないので、下のほうで説明している redux-thunk を使う必要があります
actionでは、何をしたいかをreducerに伝えるのみにし、アプリケーションの状態を変えるようなことはしないほうが設計的によさそうです
export const INCREMENT_COUNTER = 'INCREMENT_COUNTER'
export const DECREMENT_COUNTER = 'DECREMENT_COUNTER'

export function increment() {
  return {
    type: INCREMENT_COUNTER
  }
}

export function decrement() {
  return {
    type: DECREMENT_COUNTER
  }
}


// action creaters
export function incrementIfOdd() {
  return (dispatch, getState) => {
    const { counter } = getState()

    if (counter % 2 === 0) {
      return
    }

    dispatch(increment())
  }
}

export function incrementAsync(delay = 1000) {
  return dispatch => {
    setTimeout(() => {
      dispatch(increment())
    }, delay)
  }
}
Reducers
reducerでは、前のstateとactionより次のstateを計算してstoreに渡します
ここは、ただそれだけに徹する必要があります、そうでないと、設計がグチャグチャになってしまいます
import { INCREMENT_COUNTER, DECREMENT_COUNTER } from '../actions/counter'

export default function counter(state = 0, action) {
  switch (action.type) {
    case INCREMENT_COUNTER:
      return state + 1
    case DECREMENT_COUNTER:
      return state - 1
    default:
      return state
  }
}
reduxではstateをreduxオブジェクトが内部的に管理するため、一般的なモデルのようにgetter / setterを用意したりはしません
また、reducerは、アプリケーションの規模に応じて、細かく分割もできます
つまり、画面ごとに使うreducerを選んで、使うこともできます
その場合は combineReducers を使って、使いたいreducerを選びます
combineReducersに渡したreducerが、actionでgetState()できるstateになるようです
なので、渡す名前をミスすると、アプリケーションがうまく動きません
import { routerStateReducer as router } from 'redux-router'
import { combineReducers } from 'redux'
import counter from './counter'
import errorMessage from './errorMessage'

const rootReducer = combineReducers({
  counter,
  errorMessage,
  router
})

export default rootReducer
JavaScript - Reduxにおけるreducer分割とcombineReducersについて - Qiita
Presentational Components
いわゆるパーツごとのcomponent部分です
たとえば、headerやfooterなど、親のcomponentが使いやすいような単位に分割する部分です
import React, { Component, PropTypes } from 'react'

class Counter extends Component {
  render() {
    const { increment, incrementIfOdd, incrementAsync, decrement, counter } = this.props
    return (
      <p>
        Clicked: {counter} times
        {' '}
        <button onClick={increment}>+</button>
        {' '}
        <button onClick={decrement}>-</button>
        {' '}
        <button onClick={incrementIfOdd}>Increment if odd</button>
        {' '}
        <button onClick={() => incrementAsync()}>Increment async</button>
      </p>
    )
  }
}

Counter.propTypes = {
  increment: PropTypes.func.isRequired,
  incrementIfOdd: PropTypes.func.isRequired,
  incrementAsync: PropTypes.func.isRequired,
  decrement: PropTypes.func.isRequired,
  counter: PropTypes.number.isRequired
}

export default Counter
Smart ComponentsとDumb Components
このリポジトリのコードでもそうですが、 containers と components が分かれているところについて少し書きます
これは、Reactにかぎらずですが、この手のアーキテクチャを組む場合、2層構造のcomponentを使うことが多いです
それは親componentと子componentという感じです
以下の記事では、それをSmart ComponentsとDumb Componentsと呼んでいてなるほどなーと思いました
Reduxでは container が Smart Components で components が Dumb Components になります
Reduxとの依存を切り離す Smart ComponentsはReduxとの依存関係を持つ Dumb ComponentsはSmart Componentsからprops経由で全てを受け取るようにする
この設計思想は、これからもとても大切な考え方なので、きちっと実装していきたいですね
connect()
connectメソッドを使って、共通のpropsを持つ親コンポーネントを作れる
connectメソッドを使ってラップされたコンポーネントはdispatch, props, state を受け取ることができるようになる
ラップしたコンポーネントが対象、子孫コンポーネントには共有されない
計画なくどの階層のコンポーネントでもラップしてしまうと 各コンポーネントのコミュニケーションの流れが壊れるのでラップしすぎないように注意が必要
fluxフレームワークreduxについてドキュメントを読んだメモ - fukajun - 僕はvimで行きます -
Reduxのグローバルな状態とコンポーネントのプロパティをマップする関数と、コンポーネントのプロパティをReduxのActionにマップする関数がある
redux#bindActionCreators()はActionを返すメソッド群をそれぞれdispatch()でラップし、さらに1つのオブジェクトにまとめあげるユーティリティ
reduxを試してみた(2日目) - React.jsを学ぶ - Qiita
bindActionCretors()
Actionをpropsとして、バインドする
| [bindActionCreators | Redux](http://redux.js.org/docs/api/bindActionCreators.html) |
非同期でActionを呼び出す場合
export function showErrorMessageDelayed(message, delay = 1000) {
  return dispatch => {
    setTimeout(() => {
      dispatch(showErrorMessage(message));
    }, delay);
  };
}
middlewareとしてgaearon/redux-thunkを追加します
import thunk from 'redux-thunk';

const finalCreateStore = compose(
  applyMiddleware(thunk),
  reduxReactRouter({ routes, createHistory }),
  applyMiddleware(createLogger()),
  DevTools.instrument()
)(createStore);
つまり、Ajaxをするならこのタイミング
React Router
URLのパスとcomponentの構造をマッピングするライブラリ
<Route path="/" component="App">
  <IndexRoute component="Home">
  <Route path="home" component="Home"/>
  <Route path="profile" component="Profile"/>
</Route>
URLを変更するには、
import {Link} from 'react-router';

<Link to='/home'>Home</Link>
URLが変更されたときに、パスを取得するには、
function mapStateToProps(state) {
  return {
    pathname: state.router.location.pathname
  }
}
のように渡ってくるので、これをpropsとして使う
プログラムからroutingする場合は、
import React, { Component } from 'react';
import { connect } from 'react-redux';
import { pushState } from 'redux-router';

class SearchBox extends Component {
   handleClick() {
       this.props.pushState(null, '/to/other/route');
   }

   render() {
      // ........
   }
}

function selector(state) { //... }
export default connect(
  selector,

  // Use an action creator for navigation
  { pushState }
)(SearchBox);
How/where can I access router.transitionTo? · Issue #79 · rackt/redux-router
こうすればいける
React初心者のためのreact-routerの使い方 - ハッカーを目指す白Tのブログ
Redux Router
react-routerの機能は十分だが、現在表示しているページという”状態”がアプリケーションに登場する これもできればstoreに押し込めたい。ということで登場したライブラリ
JavaScript - reduxを試してみた(4日目) - redux-react-routerを試す - Qiita
故に、configureStore.jsで
const finalCreateStore = compose(
  applyMiddleware(thunk, logger()),
  reduxReactRouter({ routes, createHistory }),
  applyMiddleware(createLogger()),
  DevTools.instrument()
)(createStore)
のように渡す必要がある
はじめ、なんでroutingをstore部分に書いているのかわからなかったんですが、storeで管理して、routingが変更されたらそれがstoreから渡ってくるようにしたいがためにやっていたんですね
middleware
middleware はまだあまり調べられていませんが、 redux/examples/real-world at master · rackt/redux を参考にシンプルバージョンで解説してみます
このサンプルでは、apiにリクエストする部分をmiddlewareとして作っているようで、その呼び出し方も特徴的です
まずはmiddlewareのapi.jsから(すごくシンプルにしてあります)
api.js
function callApi() {
  return new Promise((resolve, reject) => {
    setTimeout(() => {
      resolve('success')
    }, 1000)
  })
}

// Action key that carries API call info interpreted by this Redux middleware.
export const CALL_API = Symbol('hisasann')

// A Redux middleware that interprets actions with CALL_API info specified.
// Performs the call and promises when such actions are dispatched.
export default store => next => action => {
  console.log('api: ', action);
  const callAPI = action[CALL_API]

  if (typeof callAPI === 'undefined') {
    return next(action)
  }

  const { types } = callAPI

  function actionWith(data) {
    const finalAction = Object.assign({}, action, data)
    delete finalAction[CALL_API]
    return finalAction
  }

  const [ requestType, successType, failureType ] = types
  next(actionWith({ type: requestType }))

  return callApi().then(
    (response) => {
      next(actionWith({
        type: successType,
        message: response
      }))
    },
    (error) => {
      next(actionWith({
        type: failureType
      }))
    })
}
重要な箇所は、
export default store => next => action => {
で、この形式がmiddlewareを自作するときに必要な関数になります
configureStore.js
そしてこの関数を applyMiddleware に渡すことで、一連のreduxフローの中に組み込むことができるようになります
import api from '../middleware/api'

const finalCreateStore = compose(
  applyMiddleware(thunk, api)
)(createStore)
action.js
はじめ、この部分の理解が難しかったです
return で渡しているものはただのオブジェクトで、実際にリクエスト処理を呼び出している感がなかったからです
function fetchUser() {
  return {
    [CALL_API]: {
      types: [ USER_REQUEST, USER_SUCCESS, USER_FAILURE ]
    }
  }
}

export function loadUser() {
  return (dispatch, getState) => {
    return dispatch(fetchUser())
  }
}
実際に読み解くとシンプルで、applyMiddlewareで登録したmiddlewareはactionでreturnされた後に介入できるので、
そのタイミングで、先ほどの
export default store => next => action => {
この部分が呼ばれるので、あとは、[CALL_API] で判定して必要な処理を実行しています
middlewareのタイミングでapi処理をするのが適切なのか、ちょっとまだわからないですが、reduxのアーキテクチャ上、確かにここでやるのもアリな気がします
雑感
データフローをone wayにしたアーキテクチャパターンは、昔からありましたが、キレイに交通整理し、必要な部分を必要なだけ隠蔽したというのがReduxの印象です
使い方が特殊なところもあるので、まずは慣れる、という感じでしょうか
今後調べたことをこのリポジトリに追記していきます
参考記事
JavaScript - reduxを試してみた(4日目) - redux-react-routerを試す - Qiita
ReduxとES6でReact.jsのチュートリアルの写経 - bokuweb.me
reduxを試してみた(5日目) - ajaxを使ってUIを構築する(reduxにおける非同期の制御) - Qiita
Others
Mac風のUIを作れるフレームワーク
Wordpress.comがReact/Reduxを使って全面アップデートしたOSSプロジェクト
( ・∀・)イイ!!